Entities
Let's start coding the app by defining the Task entity class.
The Task entity class will be used:
- As a model class for client-side code
- As a model class for server-side code
- By
remultto generate API endpoints, API queries, and database commands
The Task entity class we're creating will have an auto-generated id field, a title field, a completed field and an auto-generated createdAt field. The entity's API route ("tasks") will include endpoints for all CRUD operations.
Define the Model
Create a
sharedfolder under thesrcfolder. This folder will contain code shared between frontend and backend.Create a file
Task.tsin thesrc/shared/folder, with the following code:
// src/shared/Task.ts

import { Entity, Fields } from 'remult'

@Entity('tasks', {
  allowApiCrud: true,
})
export class Task {
  @Fields.id()
  id = ''

  @Fields.string()
  title = ''

  @Fields.boolean()
  completed = false

  @Fields.createdAt()
  createdAt?: Date
}- In the server's
apimodule, register theTaskentity with Remult by addingentities: [Task]to anoptionsobject you pass to theremultApi()middleware:
// src/server/api.ts

import { remultApi } from "remult/remult-express"
import { Task } from "../shared/Task.js"

export const api = remultApi({
  entities: [Task]
})
ESM
In this tutorial we will be using esm for the node.js server - that means that where ever we import a file we have to include the .js suffix for it as we did above in the import { Task } from "../shared/Task.js" statement
The @Entity decorator tells Remult this class is an entity class. The decorator accepts a key argument (used to name the API route and as a default database collection/table name), and an options argument used to define entity-related properties and operations, discussed in the next sections of this tutorial.
To initially allow all CRUD operations for tasks, we set the option allowApiCrud to true.
The @Fields.id decorator tells Remult to automatically generate a unique id using crypto.randomUUID(). This value can't be changed after the entity is created.
The @Fields.string decorator tells Remult the title property is an entity data field of type String. This decorator is also used to define field-related properties and operations, discussed in the next sections of this tutorial and the same goes for @Fields.boolean and the completed property.
The @Fields.createdAt decorator tells Remult to automatically generate a createdAt field with the current date and time.
TIP
For a complete list of supported field types, see the Field Types section in the Remult documentation.
Test the API
Now that the Task entity is defined, we can start using the REST API to query and add a tasks.
Open a browser with the url: http://localhost:3002/api/tasks, and you'll see that you get an empty array.
Use
curltoPOSTa new task - Clean car.
curl http://localhost:3002/api/tasks -d "{\"title\": \"Clean car\"}" -H "Content-Type: application/json"Refresh the browser for the url: http://localhost:3002/api/tasks and see that the array now contains one item.
Use
curltoPOSTa few more tasks:
curl http://localhost:3002/api/tasks -d "[{\"title\": \"Read a book\"},{\"title\": \"Take a nap\", \"completed\":true },{\"title\": \"Pay bills\"},{\"title\": \"Do laundry\"}]" -H "Content-Type: application/json"- Note that the
POSTendpoint can accept a singleTaskor an array ofTasks.
- Refresh the browser again, to see that the tasks were stored in the db.
Wait, where is the backend database?
While remult supports many relational and non-relational databases, in this tutorial we start by storing entity data in a backend JSON file. Notice that a db folder has been created under the root folder, with a tasks.json file containing the created tasks.
Admin UI
Enabling the Admin UI
Add the Admin UI to your React application by setting the admin option to true in the remultApi()
import { remultApi } from 'remult/remult-express'
import { Task } from '../shared/Task.js'

export const api = remultApi({
  entities: [Task],
  admin: true, // Enable the Admin UI
})
Accessing and Using the Admin UI
Navigate to http://localhost:5173/api/admin to access the Admin UI. Here, you can perform CRUD operations on your entities, view their relationships via the Diagram entry, and ensure secure management with the same validations and authorizations as your application.
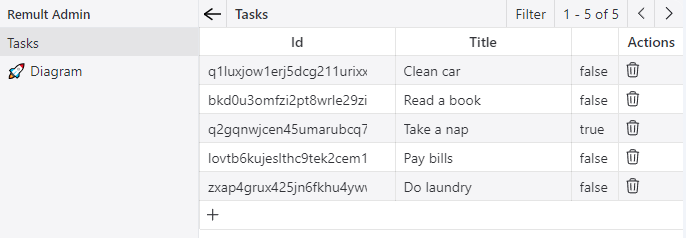
Features
- CRUD Operations: Directly create, update, and delete tasks through the Admin UI.
- Entity Diagram: Visualize relationships between entities for better data structure understanding.
- Security: Operations are secure, adhering to application-defined rules.
Display the Task List
Let's start developing the web app by displaying the list of existing tasks in a React component.
Replace the contents of src/App.tsx with the following code:
// src/App.tsx

import { useEffect, useState } from 'react'
import { remult } from 'remult'
import { Task } from './shared/Task'

const taskRepo = remult.repo(Task)

export default function App() {
  const [tasks, setTasks] = useState<Task[]>([])

  useEffect(() => {
    taskRepo.find().then(setTasks)
  }, [])
  return (
    <div>
      <h1>Todos</h1>
      <main>
        {tasks.map((task) => {
          return (
            <div key={task.id}>
              <input type="checkbox" checked={task.completed} />
              {task.title}
            </div>
          )
        })}
      </main>
    </div>
  )
}
Here's a quick overview of the different parts of the code snippet:
taskRepois a Remult Repository object used to fetch and create Task entity objects.tasksis a Task array React state to hold the list of tasks.- React's useEffect hook is used to call the Remult repository's find method to fetch tasks from the server, once when the React component is loaded.
After the browser refreshes, the list of tasks appears.